
A defensible data destruction audit trail proves five things: which asset was destroyed, which method sanitized it, who performed the work, when it happened, and a signed certificate confirming the result. Anything less leaves a compliance officer guessing during an audit. The baseline every enterprise should build toward is alignment with NIST SP 800-88 r2, backed by an unbroken chain of custody. Vendors like Usedcartridge can supply that documentation as part of a destruction service, which removes much of the burden from internal teams.
TL;DR:
- Valid audit trails require detailed, cross-referenced records including asset identifiers, destruction methods, operator IDs, timestamps, and proof artifacts.
- Ensuring chain-of-custody through signed certificates, immutable logs, and synchronized clocks prevents gaps and discrepancies in the destruction process.
- Proper verification involves physical inspection for destructive methods and software logs for non-destructive wipes, with escalation protocols for failed validation.
- Common audit failures include missing serial numbers, inconsistent timestamps, unsecured logs, and lacking certificates, all easily remedied by strict procedural controls.
- Using vendors that provide comprehensive documentation and certificates aligned with standards like NIST SP 800-88 reduces internal workload and audit risks.
Table of Contents
- What Does a Data Destruction Audit Trail Cover?
- What Fields Belong in a Complete Destruction Record?
- How Do You Build a Tamper-Evident Audit Trail?
- How Do You Verify That Sanitization Actually Worked?
- What Do NIST, HIPAA, and PCI DSS Actually Require?
- What Gaps Do Auditors Find Most Often?
- What Does a Fillable Audit-Trail Record Look Like?
- How Usedcartridge Documents Every Destruction Job
- Building for the Auditor, Not Just the Workflow
- Get Audit-Ready Destruction Without Building It All In-House
- Where to Verify These Standards Directly
- Sources
What Does a Data Destruction Audit Trail Cover?
A data destruction audit trail is the documented record proving that a specific piece of media was sanitized or destroyed using an approved method, by an identifiable person, at a verifiable time. It is not the destruction itself. It is the paper and digital evidence that the destruction happened correctly and can be reconstructed later if a regulator, auditor, or litigation team asks.
Scope depends heavily on media type, and that is where a lot of audit trails fall apart. Hard drives, solid-state drives, mobile devices, backup tape, and paper records each carry different sanitization risks and require different verification.
- Hard disk drives (HDDs): overwrite, degauss, or physical shred, each with distinct verification needs.
- Solid-state drives (SSDs): cryptographic erase or firmware-level sanitize commands, since overwriting alone often misses spare blocks.
- Mobile devices: factory reset combined with encryption key destruction, documented separately from the device wipe.
- Backup tape: degauss or physical destruction, with cartridge serials tracked individually.
- Paper records: cross-cut shredding or pulping, verified by weight or witness sign-off rather than a digital log.
NIST SP 800-88 r2 organizes sanitization into Clear, Purge, and Destroy. Clear covers standard read/write commands that block simple data recovery. Purge uses methods like cryptographic erase or degaussing that resist even laboratory-level recovery attempts. Destroy physically disables the media entirely. Auditors want to see which tier applied to each asset, because a Clear-level wipe on media headed to resale carries very different risk than a Destroy-level shred of a drive that held patient records.
What Fields Belong in a Complete Destruction Record?
Auditors don’t accept a spreadsheet with a checkmark and a date. They want granular, cross-referenced fields that let them trace one asset from intake to final disposition without gaps. Build your record around three categories.
- Per-asset identifiers. Asset ID, serial number, make and model, media type, and the assigned owner or custodian at time of retirement.
- Process details. Sanitization method used, the tool and its version number, the operator’s ID, the physical location where destruction occurred, and start and end timestamps.
- Proof artifacts. Wipe-tool export logs, success/failure codes, photographs of physically destroyed media, a signed certificate of destruction, and transport chain-of-custody records if the asset moved between locations.
Skip any one of these and you create a hole an auditor will find. Missing a serial number, for instance, makes it impossible to prove that the drive on the certificate is the same drive that left the building.
Pro Tip: Cross-reference every certificate of destruction against your original asset inventory before filing it. A certificate that lists a quantity of drives destroyed, without matching serials back to your intake log, is close to worthless in an audit.
Retention rules for these records vary by regulation, but treating every field as mandatory rather than optional is the only way to build a secure data disposal program that holds up under scrutiny.
How Do You Build a Tamper-Evident Audit Trail?
Creating the trail is a process problem, not a paperwork problem. Follow these steps in order, and don’t skip the legal-hold check.
- Define scope and check for legal holds. Before any asset gets sanitized, confirm it isn’t subject to litigation hold or a regulatory retention requirement. Destroying held data, even by accident, creates liability that no certificate can fix.
- Standardize asset identification. Assign barcodes or RFID tags at intake, and require serial number capture as a hard gate. No serial, no processing.
- Log every custody transfer. Each time an asset changes hands, whether from IT to a storage cage or from storage to a destruction vendor, record the signer’s ID and a timestamp.
- Capture verification artifacts at the point of destruction using tools that can redact PDF locally and permanently so sensitive information is securely handled in evidence artifacts. Tool success codes, photographs, and witness signatures should attach directly to the asset record, not sit in a separate folder someone has to remember to cross-reference.
- Store logs in append-only or immutable storage. Once a record is written, it should not be editable without leaving a trace. Access controls limit who can touch the log at all.
- Synchronize clocks across every system. Time-sync via NTP prevents the classic audit failure where a destruction timestamp precedes the intake timestamp, which happens more often than most teams expect when devices run on unsynced local clocks.
- Hash exported logs and schedule internal audits. Hashing log exports proves nothing was altered after the fact, and a periodic internal review catches gaps before an external auditor does.
Public-sector disposal standards, including Minnesota’s enterprise sanitization policy, lean on this same combination of photographic evidence, sealed transport, and signed disposition forms because it closes off the most common failure points in custody handoffs. The pattern holds for private enterprises too: the weak link is almost never the destruction method itself, it’s the handoff between people and locations.
How Do You Verify That Sanitization Actually Worked?
Verification differs depending on whether the method was destructive or non-destructive, and auditors expect different proof for each.
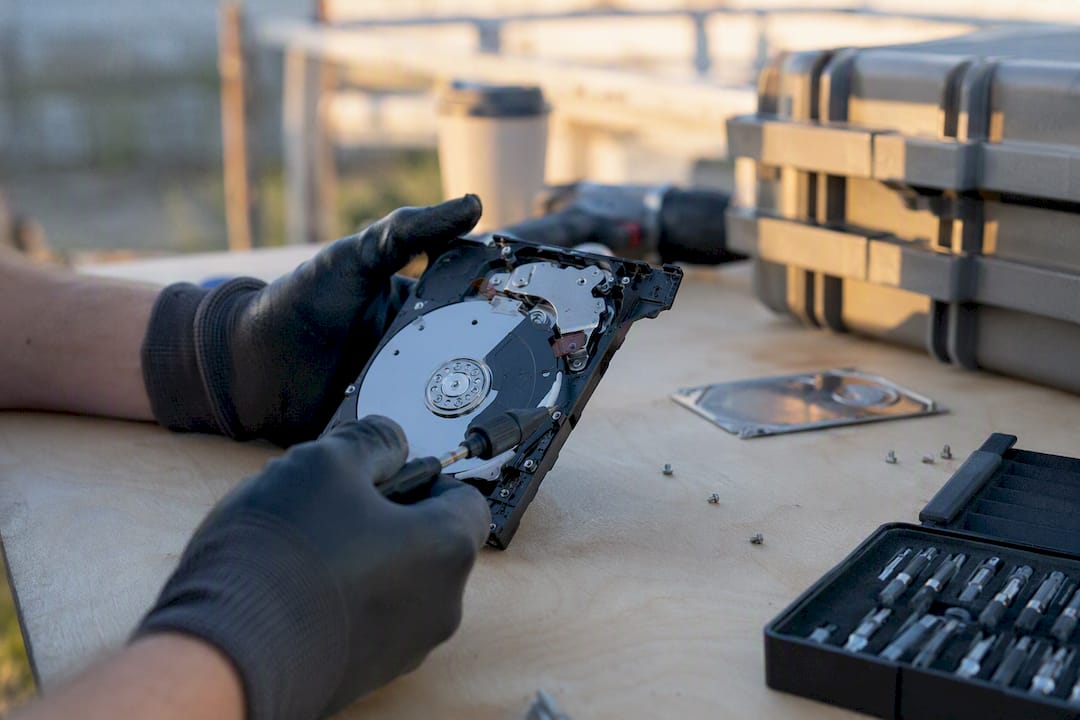
For destructive methods like shredding or degaussing, verification means physical inspection. That includes residue proof (particle size confirmation for shredded drives), equipment IDs for the shredder or degausser used, and current calibration logs for that equipment. A shredder that hasn’t been calibrated in a year is a red flag regardless of what the certificate says.
For non-destructive methods, verification runs through the software and cryptographic layer instead:
- Tool success codes confirming the wipe command completed without error.
- Sampling rules, since not every sector needs individual verification, but your sampling methodology needs to be documented and consistent.
- Cryptographic erase key lifecycle documentation, including key generation records, management practices, and any visibility gaps if an external key management system was involved.
NIST SP 800-88 r2 draws a clear line between verification and validation. Verification inspects the outcome of the sanitization action itself. Validation confirms the target data was actually rendered unrecoverable and documents whether the result is accepted or rejected. When a validation check fails, the decision rule should be automatic: re-run the sanitization once, and if it fails a second time, escalate straight to physical destruction rather than attempting a third pass.
Pro Tip: Never let a failed validation get “fixed” by simply rerunning the same tool with the same settings. If the method failed once, escalate the media class, not just the attempt count.
What Do NIST, HIPAA, and PCI DSS Actually Require?
Each standard expects something slightly different from your audit trail, and knowing the distinction saves time when a regulator asks pointed questions.
- NIST SP 800-88 r2: expects documented traceability of the sanitization method used, along with verification and validation details for every asset, including cryptographic erase key lifecycle data when CE is the chosen method.
- HIPAA (HHS): disposal guidance for protected health information expects secure disposal methods plus documentation, and a certificate of destruction is the standard proof covered entities present when PHI-bearing media is retired.
- PCI DSS: media-handling requirements, referenced under controls like Requirement 9.4, call for tracked, secured handling of cardholder-data media through disposal, with documentation showing the chain wasn’t broken.
- Records retention: hold destruction records for whatever period the strictest applicable regulation requires, and never destroy a record tied to an asset under active legal hold.
None of these frameworks contradict each other. They overlap enough that one well-built audit trail compliance program can usually satisfy all three simultaneously.
What Gaps Do Auditors Find Most Often?
The same four problems show up in almost every failed audit, and each one has a straightforward fix.
- Missing serial numbers. Intake staff skip this field under time pressure. Fix it by making serial capture a mandatory gate before an asset can be scheduled for destruction.
- Inconsistent timestamps. Devices on unsynced clocks create records that don’t line up. Fix it by enforcing NTP across every system that touches the destruction workflow.
- Unsecured logs. Editable spreadsheets stored on a shared drive are an auditor’s first target. Fix it with append-only storage and a small, named group with write access.
- No certificate of destruction. Some internal wipes never generate formal proof. Fix it by requiring a signed certificate for every batch, no exceptions.
| Gap | Risk if unresolved | Fix |
|---|---|---|
| Missing serial numbers | Can’t prove asset identity | Mandatory intake gate |
| Inconsistent timestamps | Sequence looks falsified | Enforce NTP sync |
| Unsecured logs | Records can be altered | Immutable/WORM storage |
| No certificate issued | No proof of completion | Require signed C of D per batch |
Copy this table straight into your audit playbook and check it against your last three destruction batches. If any row fails, that’s your next fix, not your next meeting agenda item.
What Does a Fillable Audit-Trail Record Look Like?
A usable template needs consistent columns your asset management system or spreadsheet can sort and search. At minimum, include asset ID, serial number, media type, destruction method, operator, start and end timestamps, verification artifact IDs, and certificate number.
| Asset ID | Serial | Media Type | Method | Operator | Start/End | Cert. No. |
|---|---|---|---|---|---|---|
| AST-4471 | SN-88213X | SSD | Cryptographic erase + physical shred | J. Ramirez | Time stamps | COD |
Index records by asset ID and certificate number, and cross-link them in whatever system stores your asset tracking data. When an auditor requests a sample, you should be able to pull any single row and its supporting artifacts in minutes, not days.
How Usedcartridge Documents Every Destruction Job
Usedcartridge performs on-site and off-site destruction and issues a certificate of destruction with every job, alongside custody logs covering secure transport when assets move between locations. That gives compliance teams a vendor-supplied artifact set they can drop directly into an internal audit trail rather than building every field from scratch. When you fold a vendor’s certificate and custody log into your own asset system, treat it exactly like an internally generated record: index it by asset ID, verify it against your intake list, and store it in the same immutable archive as everything else.
Building for the Auditor, Not Just the Workflow
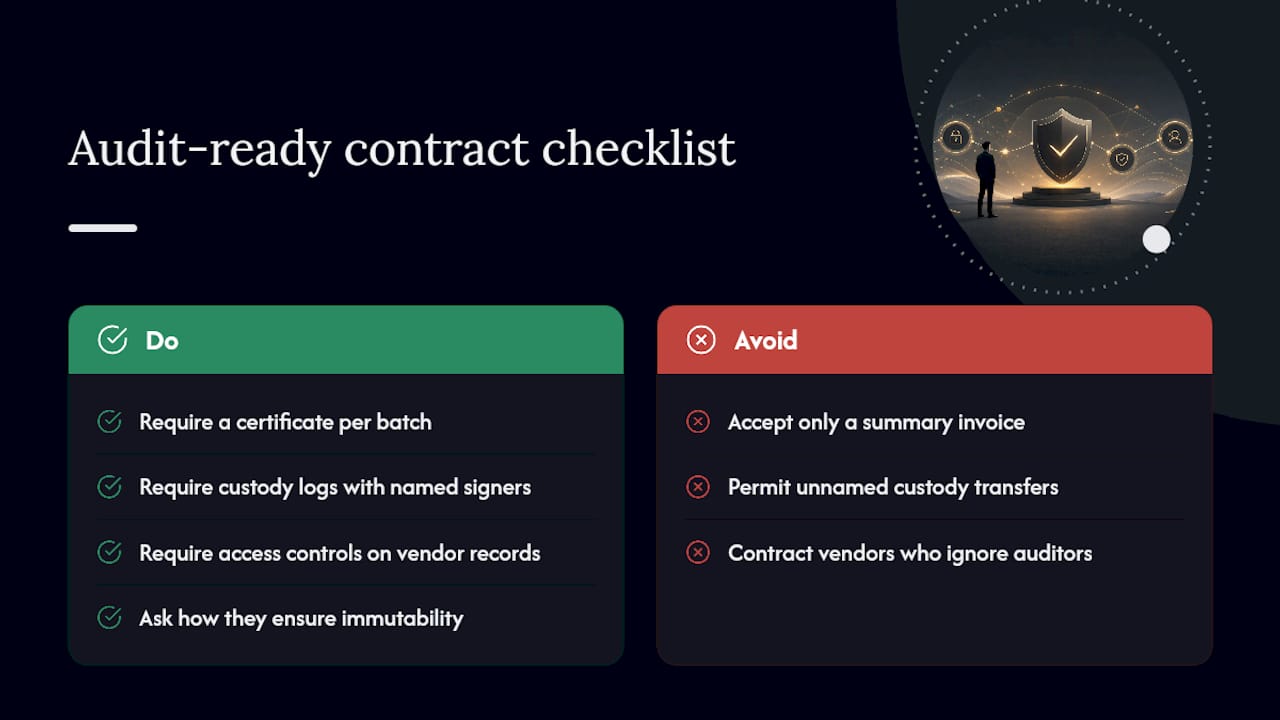
Most IT teams design destruction workflows to get devices off the books efficiently. That’s the wrong design target. An audit-ready trail must allow reconstruction of the entire chain from a certificate number alone months or years later, even by someone not involved originally.
That distinction changes what you put in a vendor contract. Require a certificate of destruction for every batch, not just a summary invoice. Require custody logs with named signers at each transfer point. Require access controls on any digital record the vendor stores on your behalf, and ask how they handle immutability. If a vendor’s RFP response doesn’t address these items specifically, they haven’t thought about your auditor, only their own operations.
— Keith
Get Audit-Ready Destruction Without Building It All In-House
Usedcartridge exists so compliance teams stop rebuilding this documentation from scratch every quarter. Rather than piecing together internal wipe logs, spreadsheet certificates, and ad hoc transport records, you get a vendor whose destruction jobs already produce the exact artifacts auditors ask for: signed certificates, custody documentation, and secure on-site or off-site handling depending on what your facility needs.

That matters most when your team is short on hours, not intent. Outsourcing the sanitization step to a vendor that documents to NIST SP 800-88 r2 standards means fewer gaps for an internal auditor to chase down later, and one less process your compliance team has to own end to end. If you’re staring down an upcoming audit or just tired of patchwork logs, request a quote for equipment destruction and see what a fully documented job looks like before your next review cycle.
Where to Verify These Standards Directly
- NIST SP 800-88 Revision 2
- HHS guidance on PHI disposal
- PCI Data Security Standard
- IRS media sanitization guidelines
Sources
- Guidelines for Media Sanitization (NIST SP 800-88 Revision 2)
- Disposal of protected health information — HHS
- PCI Data Security Standard (PCI DSS)