
Functioning SSDs should go through firmware-level secure erase or crypto erase, since either one meets the NIST SP 800-88 Rev. 2 “Purge” standard in minutes. Dead, damaged, or extremely sensitive drives need physical destruction, specifically cross-cut shredding, disintegration, or chip-level destruction. Skip degaussing, magnets, single-hole drilling, and plain overwrites entirely; none of them reliably clear flash memory. Whichever path you choose, insist on a certificate or erase log, since that record is what makes the job defensible in an audit.
TL;DR:
- Firmware or crypto erase are the fastest and most reliable methods for functional drives, with secure erase completing in minutes and crypto erase virtually instantly.
- Physical destruction, such as shredding or disintegration, is necessary for dead or unresponsive drives, but it must reduce particles smaller than NAND chips to ensure complete data destruction.
- Avoid degaussing, magnets, drilling, or overwriting, as these methods do not reliably clear flash memory and can leave data recoverable.
- Verification through an erase log or destruction certificate is essential, as success messages alone do not confirm complete data removal.
- Using certified destruction services provides a compliant, documented process ideal for handling sensitive data or large batches of old drives.
Table of Contents
- SSD Destruction Methods at a Glance: Pick the Right Approach Now
- How Do You Run Firmware-Level Secure Erase and Verify It Worked?
- Which Physical Destruction Methods Actually Destroy an SSD?
- Why Degaussing, Magnets, and Drilling Don’t Work on SSDs
- When Should You Erase a Drive vs. Physically Destroy It?
- How Do You Handle SSD Disposal Safely and Responsibly?
- Can Data Be Recovered After Destruction or Erasure?
- How Do the Environmental Costs of Each Method Compare?
- How Long Does SSD Destruction Actually Take?
- What Does Each Destruction Method Cost?
- The Real Tradeoff Nobody Talks About Enough
- Get Certified SSD Destruction Without the Guesswork
- Where to Verify These Standards Yourself
- Sources
SSD Destruction Methods at a Glance: Pick the Right Approach Now
The right method depends almost entirely on whether the drive still powers on and how sensitive the data was.
- Firmware secure erase. Best for functional drives with low to medium sensitivity data. Fast, free with most vendor tools, but only as trustworthy as the drive’s own firmware.
- Crypto erase. The quickest option for self-encrypting drives (SEDs) since it destroys the encryption key instead of touching every cell. Useless if the drive was never encrypted.
- Verified third-party erasure. Adds an audit trail for compliance-heavy environments. Costs more per drive, but gives you a paper trail regulators actually accept.
- Cross-cut shredding or disintegration. The highest-assurance option and the only real answer for dead or unresponsive drives. Requires equipment or a certified vendor.
- Chip-level destruction. A DIY fallback when you have a handful of drives and no shredder access. Slow, messy, and easy to do wrong.
Whatever you pick, keep the output: an erase log or a certificate of destruction. Compliance officers do not take your word for it.
How Do You Run Firmware-Level Secure Erase and Verify It Worked?
ATA Secure Erase and NVMe Sanitize are the firmware commands built into the drive itself, and they reach data that operating-system tools cannot touch. Under NIST SP 800-88 Rev. 2, a “Clear” only resets accessible storage areas, but “Purge” applies a technique guaranteed to defeat lab-level recovery, and both ATA Secure Erase and NVMe Sanitize qualify as Purge when executed correctly.
Crypto erase works differently. Self-encrypting drives already scramble every bit with a Media Encryption Key (MEK). Destroy that key and the stored data becomes mathematically useless without ever touching the NAND cells, which is why it finishes in seconds rather than minutes.
Here’s the practical sequence for either approach:
- Check the manufacturer’s own utility first. Samsung Magician, Intel’s Memory and Storage Tool, and similar utilities from Crucial and Kingston handle secure erase safely and log the result.
- If no vendor tool exists, use
hdparmfor SATA drives ornvme-clifor NVMe drives from a Linux environment, running the sanitize or security-erase-unit command specific to that interface. - Confirm the drive has stable power throughout. An interrupted erase can leave the drive in an unpredictable state.
- Update firmware beforehand if the vendor has flagged known erase bugs for that model.
- Pull the SMART data or vendor success code afterward and save it as your verification record, as recommended by guides like DriveWipe’s secure erase walkthrough.
Pro Tip: Run secure erase on one sample drive from a batch first, capture the log, and only then move the rest through the same process. It catches firmware quirks before you have fifty half-erased drives to sort out.
Which Physical Destruction Methods Actually Destroy an SSD?
Shredding and disintegration remain the gold standard because they reduce the drive to particles smaller than an individual NAND chip, which is the only way to guarantee no chip survives intact enough to be read in a lab. NSA’s evaluated products list for solid-state disintegrators sets performance requirements for exactly this reason: particle size, not just visible damage, determines whether the destruction actually counts.
Chip-level destruction targets the NAND packages directly, either with a purpose-built perforation device or, for smaller jobs, by removing the circuit board and physically crushing or drilling through each chip. Community write-ups like the one on Security Stack Exchange walk through the DIY version, but they also flag the real risk: airborne dust from crushed NAND packages can contain heavy metals, so this is not a job for bare hands and a hammer in the garage.
A few numbers worth knowing:
SSDs pack multiple NAND chips across the board, often four to eight on a standard consumer drive. Miss even one intact chip during DIY destruction, and a lab with the right equipment can potentially pull data off it.
Incineration, smelting, and pulverization show up mainly in classified government or highly regulated environments, where Dell’s own SSD removal documentation lists furnace destruction alongside shredding as accepted industry methods. For most businesses, this level is overkill, expensive, and environmentally costly, given the emissions and energy involved in melting circuit boards.
The tradeoff comes down to volume. A handful of drives can go through chip-level destruction in-house if someone has the tools and patience. Anything beyond a small batch is cheaper and safer to outsource to a certified shredding service, especially once you account for labor hours and disposal of the hazardous dust.
Why Degaussing, Magnets, and Drilling Don’t Work on SSDs
These methods work on spinning hard drives. They do nothing reliable on SSDs, and understanding why keeps you from wasting time on a false sense of security.
- Degaussing and magnets erase data by disrupting magnetic domains on a spinning platter. SSDs store data as electrical charge in flash cells, so a magnetic field has nothing to act on.
- Overwrite-only wiping assumes every writable block gets touched. Wear leveling and over-provisioning mean the flash translation layer keeps spare blocks and previously used cells hidden from the operating system, so a standard overwrite pass never reaches all the data, as TechTarget’s guide to SSD destruction points out.
- Single-hole drilling or casing damage can miss the point entirely. NAND chips are spread across the board, and a drill through the center of the case often leaves two or three chips completely untouched.
If a vendor pitches degaussing for your SSD fleet, that is a sign you should find a different vendor.
When Should You Erase a Drive vs. Physically Destroy It?
Run through this checklist before deciding:
- Is the drive operable? If it powers on and responds to commands, firmware erase or crypto erase is almost always the faster, cheaper choice.
- How sensitive is the data? Financial records, health data, or anything covered by HIPAA or PCI DSS pushes you toward destruction or, at minimum, verified erasure with full audit logs.
- What does your regulatory framework require? Some frameworks accept a documented Purge; others mandate physical Destroy for anything touching regulated data.
- Does the drive have resale value? A working drive going through resale channels needs verified erasure, not destruction, or you’re throwing away recoverable IT asset value.
- What’s your batch size? A dozen drives can be erased and logged individually. Five hundred drives from a data center refresh need a logistics plan, not a spreadsheet.
Whichever direction you go, keep chain-of-custody documentation for anything sensitive, and physically separate drives that fail erase verification so they get flagged for destruction instead of accidentally shipped for resale.
Pro Tip: Build a simple two-bin system at pickup: one for drives that pass verified erase, one for anything that fails or won’t power on. It’s the single easiest way to prevent a bad drive from slipping through undestroyed.
How Do You Handle SSD Disposal Safely and Responsibly?
Crushed NAND chips and shredded circuit boards release fine particulate that you do not want to breathe, so gloves, eye protection, and a dust mask rated for fine particles are the baseline for any in-house destruction work. Skip burning drives outright; uncontrolled incineration of circuit boards releases toxic fumes that a proper furnace process is designed to contain.

E-waste from destroyed drives still contains recoverable metals and materials that belong in a proper recycling stream rather than a landfill, which is why responsible e-waste recycling matters as much as the destruction step itself. A certified provider documents every drive that comes through the door, tracks it through destruction, and issues a certificate along with chain-of-custody records that satisfy most compliance audits without extra paperwork on your end.
Can Data Be Recovered After Destruction or Erasure?
The recovery odds swing wildly depending on the method, and this is where a lot of confidence gets misplaced. A properly executed firmware Purge, whether ATA Secure Erase, NVMe Sanitize, or crypto erase, leaves nothing recoverable through consumer or even most forensic-lab techniques, since the encryption key or the erase command itself removes the mapping needed to reconstruct data.
Failed or partial erasure is a different story. If a secure erase command times out, gets interrupted by a power loss, or runs on a drive with a firmware bug, some blocks may retain readable data. This is exactly why verification matters more than the act of running the command. A success message from the drive’s controller is not optional information, it’s the difference between a compliant erasure and a liability sitting in a box.
Physical destruction sits at the far end of the spectrum. Chip-level destruction that misses a chip leaves that one component fully intact and readable with the right lab equipment, which is the scenario security researchers warn about repeatedly. Shredding or disintegration to particle sizes smaller than a chip removes that risk almost entirely, since there’s no intact chip left to extract.
Encryption offers a middle path worth knowing about. If a drive was encrypted from the start, destroying or discarding the encryption key renders the data unreadable for practical purposes even without touching the physical media, an approach Backblaze covers in its SSD disposal guidance. It’s not a substitute for full destruction on highly sensitive drives, but it’s a legitimate fallback when a drive can’t be erased through normal channels.
How Do the Environmental Costs of Each Method Compare?
Firmware erase wins environmentally by default, since it keeps the drive intact and resalable or reusable, which avoids the energy and material cost of manufacturing a replacement. A drive that gets wiped and redeployed or resold never enters the waste stream at all.
Shredding and chip-level destruction turn a working drive into scrap immediately. That scrap still contains recoverable metals, gold, copper, and rare earth elements among them, but only if it flows into a certified recycling channel afterward rather than a landfill. The shredding process itself uses electricity and generates fine particulate that needs proper containment and filtration, which is part of why NSA’s evaluated disintegrators come with performance and safety specifications rather than being a simple mechanical box.
Furnace destruction and smelting sit at the far end of environmental cost. Melting circuit boards and chips takes considerably more energy than mechanical shredding, and it can release emissions that require environmental controls to manage safely. This is one more reason incineration-style methods stay reserved for classified or heavily regulated destruction requirements rather than routine IT asset disposal.
The practical takeaway: erase whenever the drive and the policy allow it, and when destruction is unavoidable, route the shredded material through a recycler that actually processes it rather than one that stockpiles it. A certificate of destruction tells you the data is gone; it doesn’t tell you whether the metal inside got recovered responsibly.
How Long Does SSD Destruction Actually Take?
Firmware secure erase is the fastest option by a wide margin. ATA Secure Erase and NVMe Sanitize typically finish in anywhere from a few seconds to a few minutes per drive, depending on capacity and controller. Crypto erase on a self-encrypting drive is nearly instant, often under a second, since it’s destroying a key rather than touching stored data.
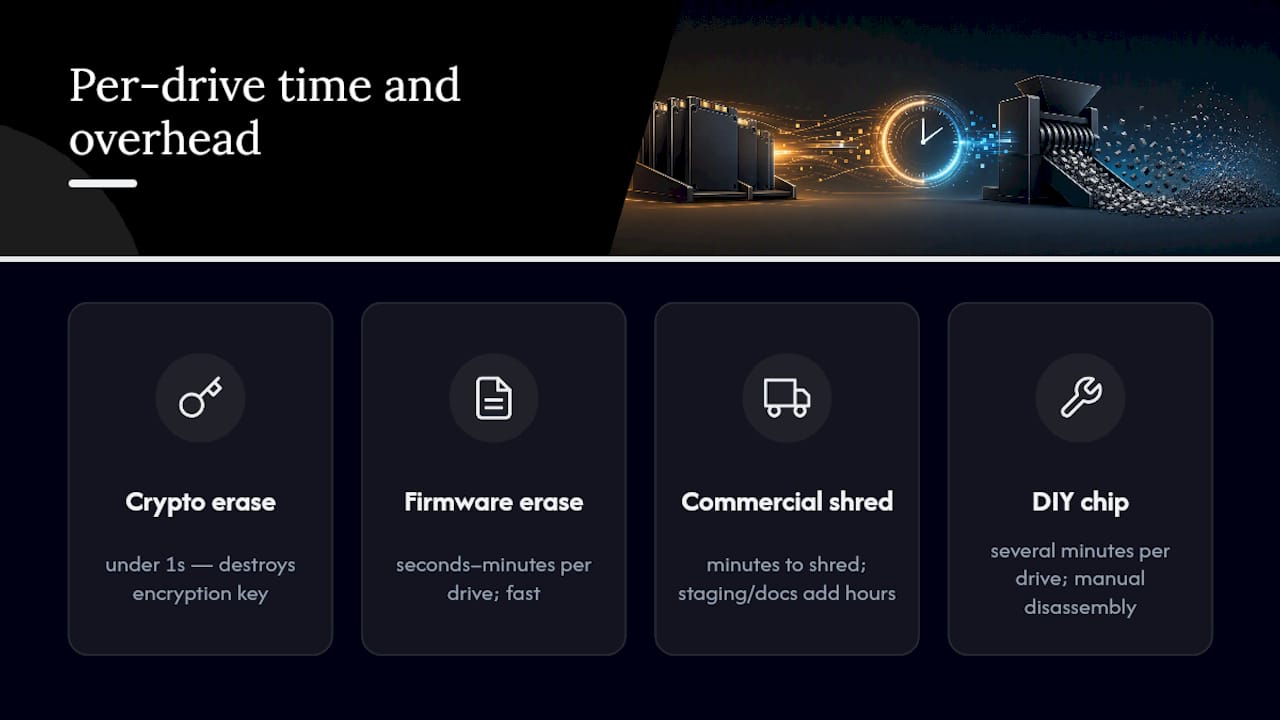
Batch erasure changes the math. Running secure erase across fifty or a hundred drives through vendor software or scripted hdparm/nvme-cli commands adds setup and verification time, but the per-drive erase itself stays fast. Most of the real time cost in a bulk erase job goes to logging and confirming success for each drive individually, not the erase command itself.
Physical destruction runs slower per unit but scales differently. A commercial shredder or disintegrator can process a stack of drives in a matter of minutes once staged, but the staging, chain-of-custody documentation, and certificate generation around it can stretch a job to a few hours for a modest batch. DIY chip-level destruction is the slowest path by far: expect several minutes per drive for safe disassembly, chip targeting, and cleanup, which adds up fast once you’re past a handful of units.
For any volume beyond a small office cleanout, a scheduled pickup with on-site or off-site destruction and same-visit certification is almost always faster end-to-end than doing it piecemeal in-house.
What Does Each Destruction Method Cost?
Firmware secure erase costs the least per drive since it needs no special equipment, just time and, in some cases, a vendor utility that’s already free. The real cost is labor: someone has to run the command, verify success, and log the result for every drive.
Crypto erase costs even less in practice, since it takes seconds and requires no specialized tooling beyond the drive’s existing encryption support. The catch is that it only works if the drive was set up as a self-encrypting drive from the start.
Verified third-party erasure adds a per-drive or per-batch fee on top of the labor savings from outsourcing, and that fee buys you an audit trail a regulator will actually accept.
Physical destruction costs more per drive than firmware erase, largely because it involves equipment, staffing, and disposal logistics that basic erasure doesn’t need. Outsourcing to a certified shredding or disintegration service usually costs less overall than buying equipment for occasional in-house use, especially once you factor in the safety gear and downtime a DIY setup requires. Chip-level DIY destruction looks free on paper but eats labor hours that, for most organizations, cost more than a scheduled destruction service would have charged.
The Real Tradeoff Nobody Talks About Enough
Most guidance on this topic treats erase and destroy as a technical choice. It’s really a risk and cost tradeoff dressed up as a technical one. Physical destruction feels safer because it’s irreversible and visible, but a verified firmware Purge on a working drive is just as defensible and a lot less wasteful.
The mistake I see most often is treating an SSD like the hard drive it replaced, reaching for a drill or a magnet out of habit rather than checking whether the drive even responds to a secure erase command. The second mistake is skipping verification entirely, running an erase and trusting it worked without pulling the log. If your drives are dead, your data is classified, or you’re staring down a batch too large to erase and verify one by one, that’s the point to call in a certified destruction service rather than improvise.
— Keith
Get Certified SSD Destruction Without the Guesswork
A certified destruction service offers a documented, audited destruction process that holds up if a regulator or a client ever asks how your old drives were handled. 
For organizations dealing with dead drives, sensitive data, or a batch too large to erase one at a time, Usedcartridge offers secure data destruction alongside equipment destruction services, with on-site or off-site options depending on your volume and timeline. Every job comes with the paperwork that matters: a certificate of destruction and chain-of-custody documentation your compliance team can actually file. Beyond the drives themselves, Usedcartridge handles the broader e-waste logistics side too, so the equipment those SSDs came out of doesn’t end up in a landfill either.
If you’ve got a stack of drives, dead or otherwise, that need to disappear on record, request an IT asset recovery and destruction quote and get a scheduling window that fits your compliance deadline.
Where to Verify These Standards Yourself
NIST SP 800-88 Rev. 2 defines the Clear, Purge, and Destroy hierarchy that governs every method in this article. NSA’s media-destruction guidance covers acceptable destruction technology for flash storage specifically. Dell’s SSD data removal documentation details manufacturer-approved erase and destruction options, and a broader look at NIST sanitization rules for business use adds useful context for compliance teams outside the US.
Sources
- NSA EPL: Solid State Disintegrators (April 2025)
- How to Secure Erase an SSD (SATA & NVMe) — DriveWipe
- Key steps to destroy an SSD and protect your data — TechTarget